Showing posts with label android. Show all posts

Sunday, November 26, 2017

Arduino Project One: A detour into 3D printing

This is a sidebar to the main project thread. This is all about 3D printing.

By the way, as this entry shows, I'm a babe in the woods when it comes to 3D printing, both the software used to create the models, and the procedure to transfer the model to a printer and to print them. Advice from my readers — knowledgeable and useful advice — would be appreciated. Feel free to add a comment.

In my last update, "Lots of Progress", I repeatedly mentioned SolidWorks because I thought it was the only game in town.

SolidWorks, really good 3D design SW by Dassault Systemes

Hah.

Our local library has two 3D printers. They suggest Tinkercad for casual 3D design work, Sketchup for more serious 3D design work, and Cura LulzBot Edition for printing your design on one of their LulzBot printers.

Tinkercad, by AutoDesk (that's a Raspberry Pi case)
Sketchup, by Trimble, Inc. (this screenshot is from when it was a Google product)
Cura LE (Lulzbot Edition)


Know what? All of those software packages are free. Actually, Sketchup is available in a free and a Pro ($695 - cough) version.

Sketchup has grown up since Google bought it from that little company in Boulder and encouraged people to use it to plant structures all over Google Earth.

So now I have my 3D printing toolpath defined. As with Corona SDK, I'm sort of familiar with the technology from my computer-game-programming days. I'm sure it's come a long way in 12 years, but it's nothing I can't pick up quickly.

UPDATE, THE NEXT DAY:

Hey! I already have Wings 3D on my computer. It's part of my game-programming toolpath! It can export StereoLithography (.STL) files, the preferred file format for Cura LE. Wings 3D is open source and supported by a huge community.

Wings 3D, a powerful 3D modeler used by the gaming and CGI industries.

I may not need to install any new software to do my 3D designs. We'll see ...

UPDATE, THREE DAYS LATER:

I totally ignored 3D Builder, an app first included in Windows 8.1 and currently part of Windows 10. It looks like 3D Builder is for the casual user, similar to Tinkercad. Most screenshots I've found are for toys and trinkets, but here's a not-so-casual design that looks pretty impressive.

3D Builder by Microsoft, now an integral part of Windows 10

If you don't use 3D Builder, then it and its companion apps, such as Paint 3D, are simply a waste of space on your hard disk. But if they're there and they're free, they may be worth a look.

Searching online for information on 3D Builder, I haven't found anything written about it (I mean, like reviews or tutorials) that is all four of these:
  1. current
  2. serious and useful
  3. written by a serious user, not just a fan or a professional reviewer
  4. offered by a third party (not written by Microsoft or published on a Microsoft page)
I welcome any serious and useful input from my readers, about 3D Builder.

UPDATE, 15 AUGUST 2019: Two years later, the 3D design landscape has changed. As I finally sit down to design the enclosure for my Arduino project, I re-review my toolset and make a few changes of my own. Read about it here.


To read the other postings about this project, click here and scroll to the end.

Arduino Project One: Lots of progress

Introduction

I got to put a lot of time into the project this weekend, and I got some cool stuff done. I ... well, here are two pictures for you, and then the details.

Things glowing in the dark

Lit by a desk lamp - I have to learn to take better pictures.

Hardware fully assembled

I put all the hardware pieces together. In the picture above, you will see the Arduino stack at the top. You've seen this before.

The breadboard has two new peripherals. First, at bottom center is a 16-by-2 liquid crystal display that I found while looking for jumper wires in the Sunfounder Project Super Starter Kit. This LCD can run with either a 4-bit or an 8-bit interface, plus 2 more digital pins for the RS and Enable signals. 

Second, the little red guy on the right is the Hall Effect sensor. When installed, this will be on the other end of a ten-foot long cable, mounted to the lintel.

You will notice a potentiometer on the left side of the breadboard. That's to control the contrast of the display. This is absolutely necessary with an LCD display. In the final enclosure, I'll use a trim pot that can be adjusted with a jeweler's screwdriver, through a hole in the enclosure.

Arduino software (almost) complete

The Arduino program is almost fully fleshed out. It searches for a Wifi router / access point, connects to it, and displays the SSID (the router's name) and its own IP address. Internally it has a list of access points, and cycles through them until it makes a connection.

In case of power failure, the Arduino program restarts, and with any luck the ESP8266 will have saved the connection information from before the power failure. If not, it will take several minutes for the router(s) to reboot, so the ESP8266 will count down 10 minutes on the display and then try again.

Once it has a connection, it starts a TCP server and opens a socket on an out-of-the-way port, to listen for clients. Every ten minutes it pings the router to make sure the Wifi connection is still good. 

That's where things stand right now.

When a client opens a connection to the server, well, that code is still in skeleton form. Before I can finish it, I have to write a client program in Python or C (or Corona!) to exercise the connection. That's one of the next steps.

The display

This was a bit of serendipity. I'd forgotten that Sunfounder kit came with an LCD. This is the standard 16x2 display based on the common ST7066/HD44780 parallel interface. This is a white-on-blue one with not very good contrast, so I'll buy a white-on-black or red-on-black one for the final product. I'd really like an old-fashioned, dot-matrix alphanumeric, 16x2 red LED display, but I haven't seen any of those for a while.

The display uses 4 digital pins for data, and one each for RS and Enable, so it fits within my pin budget.

Incorporating it into the code was a cinch, thanks to the Arduino LiquidCrystal library.

Detour: Who (or what) is "Eorlingas"?


For those of you who already looked it up on the Web, congratulations. For those of you who didn't even have to look it up ('cause you already knew!), I offer you my deepest regards.

For years, every new computer, callphone and game system in our family has borne the name of a fictional horse. When high-speed Internet finally made it to our neighborhood (yes, children, some of us first got our Internet through the phone line - at 2400 bits per second!), we needed a good name for our router, and we chose Rohirrim, the formal name for the Riders of Rohan, from The Lord of the Rings. Since that time, we have worn out or obsoleted four routers, and we're on our fifth one. It's the Fifth Detachment of the Rohirrim, or FifthRohirrim

The architecture of our house is such that the back rooms don't always receive a good signal from the router. I want the router to be hard-wired into our Xbox and our TV, so I can't move it. So, I installed a Wifi repeater in the back of the house. (By sheer coincidence, although I'd love to claim clever planning, this repeater is located about six feet above the garage door opener.) The repeater can't be named after a horse, since it's part of the infrastructure, not a computing device.

"Rohirrim" is an ancient Gondor word. The Rohirrim didn't use that word to identify themselves. In the ancient language of Rohan, they were descended from a king named Eorl, hence they were the Sons of Eorl — the Eorlingas.

I will claim clever planning for that one.

Back on the main road: the Hall effect sensor

I decided to try the ACS712 dev board first, because it has built-in trim pots for Vref and gain. I only had to connect it to 5V, ground, and an analog input on the Arduino. I wasn't happy with its performance at first. The voltage level drifted all around. I finally got it to settle down, but I can't have it drifting like that in real life.

When I finally got it settled down, I used a refrigerator magnet to manipulate it. I got the Vref and gain pots adjusted so that it pegged at 0.0 V without the magnet, and at 5.0 V with the magnet touching the chip.

Some voltage level in the circuit is floating. I don't understand the circuit well enough to fix it yet. Maybe I need to put a load (you know, a resistor) between the two current input pins.

Other than that, the sensor just works without complaint or fuss. Clearly, I have more homework to do before I can use it in real life, but this weekend's results were promising.

It needs a case, an enclosure

I've been thinking about this for a while. I'm going to have to put the Arduino in a case.

All of the Arduino Uno R3 enclosures I've found so far are for just the Arduino Uno R3 board. Once you add a shield to your Arduino, it outgrows the enclosure.

A generic project box might be okay, but it can't be metal, because of the Wifi.

I thought of 3D printing one. I don't know SolidWorks, which I think is what everyone uses, so I'd have to learn SolidWorks. I looked for ready-made 3D printable designs, and the first one I found was, I'm really sorry to say this, ugly

Okay, I just looked again, and there are some better-looking ones out there. None of them solve my height issue, but if I can get their source and manipulate it in SolidWorks or something, then I can take care of that myself.

I also need to include openings for: the LCD, the contrast adjustment for the LCD, and any LEDs I want to make visible.

I think that making the enclosure, and fitting everything in it, is going to be more work than the hardware and software parts of the project. Maybe I'll just use a cardboard box, an X-Acto knife, and clear packing tape. I'm only half-kidding.

The sensor needs an enclosure too

I can't just nail the Hall effect sensor to the beam in the garage. It will be exposed to a rather harsh environment. I may need to 3D print a case for it as well.

Alternatively, I could encapsulate it in potting compound. That would be just as good - but I'd have to find a way to include mounting holes. And whatever I do has to be nonmetallic, or at least nonmagnetic or nonferrous. Hmm. That will take more thinking.

What's next

I've made good progress so far. Here's what I still need to do

  1. Write a TCP client in Python or C, to exercise the server.
  2. Port that TCP client to an Android app, using Corona SDK.
  3. Finish the Arduino code:
    1. Hall effect sensor
    2. Debug the TCP client-handling code
  4. Finish the Android app as well.
  5. Get a real LCD display.
  6. Design and fabricate enclosures for the Arduino stack and the sensor.
  7. Assemble the whole thing.
Other items that come to mind:
  1. Try the breadboard design in the garage before I commit to a final design.
  2. Run Wireshark while the server is running, to see who tries to call my Arduino.
  3. Configure my router to allow passthrough only on the designated port, or from designated clients.
  4. Exercise the challenge-and-response algorithm.
  5. Document the whole thing.


To read the other postings about this project, click here and scroll to the end.

Wednesday, November 22, 2017

Arduino Project One: The Arduino program takes shape

Introduction

This week, I created the skeleton of the program for the Arduino stack. I'm not ready to share my source code yet. Let me get the rest of the meat on the skeleton first.

Security

I listed some ideas for my cybersecurity scheme last week. I have incorporated all of the measure I listed into my program. I'm sure there's a hacker out there somewhere who will figure it out. My description here isn't meant as a challenge to them. It's just to inform you of some simple things that worked for me.
  1. I've chosen a port number, out of the 65,535 available, that's easy to remember.
  2. The server will only accept client requests from specified devices, and not from the world at large. Although MAC address spoofing is a thing, this will stop all but the most determined hackers.
  3. The server will use TCP instead of HTTP, trading long and legible transactions for short and incomprehensible ones.
  4. The router autoforward will be tweaked so that only TCP requests via the specified port can get through to the Arduino.
  5. The server uses a challenge-and-response mechanism, like two spies swapping passwords. When a socket is opened and the client's authorization is verified, the server sends the client a randomly-generated numeric sequence. The client must reply with the proper numeric sequence. I intend to keep the details of this algorithm proprietary. Sorry, folks.
  6. It may be necessary to have the server go through the challenge-and-response several times in the life of a connection.

Robustness and Reliability

The terms "robust" and "reliable" are not synonymous. "Reliable" means that the system will not fail during regular operation as a result of stupidity — my stupidity, to be specific. "Robust" means that the system can recover from power failures and loss of Wifi signal all by itself, without any human intervention.

When the Arduino is first powered up, or when it recovers from a power failure, it looks through its list of available Wifi routers and tries each one in turn, until it gets a connection. If it doesn't get a connection at all, then it sets a timer for 10 minutes and tries again. This is because it can take DSL modems and Wifi routers a while to recover from a power failure too, so if it doesn't catch one the first time, it gives it time to reboot.

After it gets a Wifi connection, it sets up a permanent TCP socket to listen for client requests. Although client requests are the whole reason for its existence, they're not very frequent, so it will spend most of its time being idle.

Every 10 minutes or so, it will ping the Wifi router, to verify that it still has the connection. If the ping fails, then the Arduino has lost the connection, so it goes through the power-up sequence again.

When a client requests a connection, the Arduino opens a temporary TCP socket for that client. It will be up to the client to send a TCP query every second or so, unless it's sending a button-push command. It's up to the client, whether it's a webpage or an Android app, to politely say goodbye and close the socket when it exits. (I'm sure that Corona SDK and JavaScript include onExit() event servers, or something similar.)

But it's possible for the remote client to just drop the connection - battery dies, phone gets run over, computer blue-screens, that sort of thing. So the Arduino will set a watchdog timer when it opens the temporary socket. Any query from the client resets the watchdog timer (that's called "kicking the watchdog" in Embedded Programming Land). If the client doesn't send a query for a long time, the watchdog timer expires, the Arduino says goodbye to the client in case the client is listening, and then the Arduino closes the socket.

TCP/IP

I haven't decided whether to allow multiple clients yet. Normally, only my wife and I will be using the app, and very seldom at the same time. It would be crazily rare to have three people trying to control the garage door at once. Still, it would be annoying for one person to open the app on their phone, and the other person try to open it on theirs, and get the equivalent of a busy signal. So I'll probably have to allow multiple clients.

I haven't put in the actual TCP/IP commands yet. That's for later. 

Sensor and Actuator

I haven't wired up the Hall effect sensor, and I haven't written any code for it. And although I haven't actually connected the relay to the garage door opener yet, I have written the relay code, and I've verified that the relay shield plays nicely with the ESP8266 shield.

What's Next

I'll stick with this program until it's finished. Then I'll need to write a server in plain vanilla C, or maybe Python, to test it. Once the program is finished and it works, I'll post the source code.


To read the other postings about this project, click here and scroll to the end.

Thursday, November 16, 2017

Arduino Project One: Moving right along

I have a lot to report this time. Good things have been happening.

No Corona app yet: More Arduino programming

I didn't write the app on yet. I thought I'd better characterize the Arduino hardware stack a little more.

First, I wrote a little relay demo that turns the relay on and off every second. I needed to find out how easy it was. It's ridiculously easy.

Then I wrote a webserver for the Arduino/ESP8266. I let the thing run open-loop. I tried to access the Arduino's webpage from both my phone and my PC. I was only successful part of the time. I read some online reviews of the ESP8266 shield, and some people complained that it worked once, and never again. Others complained that it didn't have the advertised range. I took two different approaches to this problem.

  1. I modified the SparkFun ESP8266 libraries to print out more information about the clients it was connecting with. I need to know the client's IP address, because other than my own phone and maybe a JavaScript TCP client on my website, nobody should be monkeying with this IoT gadget. I know that full-PC webservers always snoop clients' IP addresses. So I had the Arduino send a command AT+CIPSTATUS to the ESP8266 every time it got a client request, and  log the text of the client request on its serial output.

    After I was finished testing the webserver using the browsers on my phone and my PC, I left the logger running while I did other stuff. HOLY COW! I think that the passthrough is enabled by default on my router. My little Arduino was fielding requests from all over the world. I never did see any IP addresses, but good grief, there's a bunch of nosy machines out there. I couldn't tell if they were humans, spiders, or bad guys. I'll definitely need to use a proprietary port number on my webserver, and I'll definitely need to put restrictions on the passthrough.
  2. I dug up a Coredy E300 repeater/AP/router I've had sitting around for a year or longer, and configured it as a repeater. I plugged it into a wall outlet in the bedroom, almost exactly six feet above the garage door opener. Bonus! This also gives me better Wifi reception in the bedroom and the loft.

Don't give up on the Electric Imp yet

I should mention that this week I got an automated email from SparkFun asking me how I liked my Electric Imp purchase, and reminding me that they were available for tech support and troubleshooting. If I didn't know it was automated, I would have thought they were reading my mind. Or my blog. I will follow up with them on the Electric Imp. It would be cool to get it working.

HTTP vs. TCP

I noticed a lot of dropped bytes in the Arduino's webserver log. I don't know whether they were dropped between the client and the ESP8266, the ESP8266 and the Arduino, or the Arduino's serial port and my PC's Arduino terminal window. I should try using puTTY for my serial I/O and see if it has the same problem.

In the meantime, that got me to thinking: maybe I don't need a full-blown webserver on this project. I mean, Rick S. wrote an awesome webserver for RLE's products, and I learned a lot from working on those projects, but if the user interface is going to reside on an app or on a protected page at my own website, then all I'll need between the Arduino and the client are as follows:

From the client:
  • connection request
  • response to the Arduino's security challenge
  • garage door status query
  • button push
  • response to the watchdog signal ("Yes, I'm still here")
From the Arduino:
  • security challenge in response to connection request
  • garage door status, either in response to a query or initiated by the Arduino
  • acknowledgement of button push
  • a watchdog signal ("Are you still there?")
I don't need HTTP for that. TCP will work just fine.

Security

I am paranoid about a hacker getting into the Arduino, figuring out what it's doing, and using it to burgle my house. I thought of somehow incorporating a public/private key into the interface, but I don't know if the Arduino supports that. So I'll be taking these other security measures:
  • Using a proprietary port number. There's only 65,535 to choose from.
  • Using TCP instead of HTTP, making for shorter messages which will be unintelligible to anyone else.
  • Only accepting client requests from specified devices, and not from the world at large.
  • Tuning the router settings so that it only passes through requests using that port, and from those devices.
  • Incorporating a challenge-and-response feature. When a socket is opened and the client's authorization is verified, the server sends the client a randomly-generated numeric sequence. The client uses the numeric sequence to compute and send the server a numeric sequence in response. If the client's response isn't what the server expected, then the server closes the socket.
The challenge-and-response feature isn't very sophisticated, and it may not even be necessary, given all the other precautions. We'll see.

The system will still be vulnerable to DDoS attacks. There's not much I can do about that. Everything connected to the Internet is vulnerable to DDoS attacks.

A short hardware update

This week I stopped at Home Depot and bought 20 feet of shielded, round, 28 gauge 4-conductor cable, suitable for this project and others. The final installation of the Hall effect sensor will only need 10 feet.

I'm considering what kind of enclosure to get (or make) for the Arduino stack. It will need to be plastic, or at least transparent to Wifi signals. I'd like to have some status LEDs visible through it. 

Red-on-black LCD display from Sparkfun

I got a wild-hair idea this evening, that it would be good to have a small LCD or LED display on the enclosure, always displaying short status messages. I can start without it, and it's not really necessary, but it would be a nice touch.


To read the other postings about this project, click here and scroll to the end.

Saturday, November 11, 2017

Arduino Project One: Corona hits a roadblock

This project has many different facets, and a lot of new things to learn. Development is definitely not linear. It can go in many different directions simultaneously — and that's a good thing, because some of those different directions run into roadblocks.

The Corona Roadblock

For example, there's nothing that says I have to have the webserver running on the Arduino stack before I start working on the Android app. With that in mind, I concentrated on learning Corona this week. Since I once ran a game programming company, I'm familiar with this genre of software. So it seemed like a safe and comfortable place to go.

I downloaded the Corona SDK and worked through the Getting Started tutorial. The last step was to do a live build, installing a development version of your app on your Android device.

Sadly, it was not to be. When I selected File > Build > Android from the Corona Simulator, I got this error message:
Stupid error message.


I selected Yes, and I ended up downloading and installing Java SE Development Kit 9.0.1 for Windows, 64-bit. (It doesn't give you much choice.) After it was installed, I ran Corona and selected File > Build > Android again. Same error message.

I went to the Corona community forums and found this recent thread, which says that Corona SDK 2017.3135 doesn't support the 64-bit JDK. But a fix is coming, and in the meantime, the awesome Corona staff posted a link to the older, 32-bit, Java SE Development Kit 8u151. The word on the Web is that multiple JDKs can exist on my computer at once, so I'll leave 9.0.1 installed.

Corona's not the only game in town. But I'm comfortable with it, with my gaming background. My son has used it successfully and speaks highly of it. And I really don't feel like downloading, installing, and learning yet another development kit. I already have enough new tools to learn. But I went ahead, and downloaded and installed 8u151.

It works! Back in Corona, File > Build > Android built a .apk file for me.

Then I needed to practice installing it on my phone. The Corona Signing and Building page says that if I don't have the Android SDK installed, I can upload the .apk file to a webserver, then download it to my phone, go to the Downloads directory, and simply tap on the .apk file to install it. However, the Signing and Building page also says that I can use the adp install command to install the .apk file directly.

Two problems arose. First, the debug version of the app was so big that it exceeded (what was left of) my daily limit on my webserver, so detouring through the webserver was out of the question for the day. Second, adb is the Android Debug Bridge, which is part of the official Android SDK, and I inferred from the Corona documentation that adb is rather important.

So even though I didn't want to "download, install and learn yet another development kit," that's exactly what I did. First, I mistakenly downloaded and installed the Android Studio IDE. If adb was part of Android Studio IDE, it was hidden very well. I couldn't find it. Then I looked on the Corona debugging page, and it gave some clues on how to download the command-line-only Android SDK tools. That was a relief — if I had to download the entire Android Studio IDE, why was I even bothering with Corona? So I happily uninstalled Android Studio IDE.

According to the debugging page, I needed to install at least the Android SDK Tools (I had to scroll down to the bottom of the page to find them) and Android SDK Platform Tools. It took some sleuthing to find those links. The adb tool is in the Platform Tools, so I had to make sure I had that one.

I unzipped the downloaded files and stored them in C:\Program Files\Android\sdk-tools, in the subdirectories tools and platform-tools.

For a test, I tried installing the StarExplorer app from the Corona SDK "Getting Started" tutorial. It took a couple of tries to execute the adb install command:
C:\Program Files\Android\sdk-tools\platform-tools>adb install -r "\Users\Ray\Documents\Corona Built Apps\StarExplorer.apk"\Users\Ray\Documents\Corona Built Apps...d. 2.8 MB/s (27069109 bytes in 9.069s)        pkg: /data/local/tmp/StarExplorer.apkSuccess
C:\Program Files\Android\sdk-tools\platform-tools>
Finally it was successful - but then I couldn't find the app on the phone. I looked in the Apps pages, but StarExplorer wasn't there. Then I looked for the /data/local/tmp directory using the My Files app and I couldn't find it.

It turned out that I was being impatient. It just took a while for the phone to update its files. After about 20 minutes, I went back to the Apps pages and I found it. The app ran perfectly on my phone.

To make it a little easier the next time I install an app, I added the paths C:\Program Files\Android\sdk-tools\tools\bin and C:\Program Files\Android\sdk-tools\platform-tools to my PATH environmental variable. Now I don't have to type in adb's entire pathname to run it.

So even though it was a real trip down the rabbit hole, collecting and installing all the tools to build and install the app on the phone, it finally worked.

Corona Does Networking!

On the bright side, I did find out this week that Corona has a network library. Reading the API documentation and looking at some examples, I'd say that this will do the trick nicely. 

So What's Next?

Now I can write the app. Once it's completed, I'll go back to the Arduino. I have to do the following:
  1. get the relay clicking
  2. try out those Hall effect sensors
  3. write the webserver and exercise it from my home network
  4. get my DSL modem / Wifi router to passthrough HTTP requests to the Arduino webserver.
  5. exercise the Arduino webserver from outside my home network

What about Internet privacy?

One thing that I haven't thought about until now: I need to research privacy / security measures for the Arduino webserver. I don't want the whole world to know when my garage door is up or down, and I definitely don't want strangers activating it. Moreover, I don't want someone in Uzbekistan hijacking my Android, turning it into a bot, and using it to mount a DDoS attack on an embassy somewhere.


To read the other postings about this project, click here and scroll to the end.

Wednesday, January 4, 2017

Beware of PhotoKeeper


UPDATE, JULY 10, 2017: You will notice that one of the comments is from the developers of PhotoKeeper. They give a plausible explanation for the scamming/spamming behavior, and they ask us (you and me) to consider trying the app again.

And the PhotoKeeper entries at Google Play and the App Store have been VERY recently deleted and rewritten. All of the old reviews are GONE.

This review was written in January 2017. The developers submitted their comment on April 20, 2017. And yet, according to this webpage, as of May 23, 2017, PhotoKeeper was still spamming.

I'd like to hear some more comments from people who either tried the app, or received an email from PhotoKeeper, after April 20, 2017. Is it now well-behaved, or is it still spam?


UPDATE, JULY 12, 2017: I've been snooping around the Internet, and I've found plenty of reports that confirm that PhotoKeeper is still spamming people.


UPDATE, SEPTEMBER 27, 2017: PhotoKeeper disappeared from the App Store and was replaced by Photo Backup. This happened about two weeks ago. The text looks the same, and the creators are the original PhotoKeeper creators. Let's see if Photo Backup turns out to be spam as well.

UPDATE, DECEMBER 1, 2017: PhotoKeeper announced that they're going out of business as of January 31, 2018. See the announcement here.


  End of updates


Beware of the PhotoKeeper app!

You may get an email from a friend — or perhaps from an address you don't even recognize — that says:
"Hi Ray, you just got photos!
You were granted access to photos by @jjb4929 because you're in their network.
Click to see 24 photos on PhotoKeeper. "

So you click on the link.

If you're on a PC, you go to a page that says:  
"We’re still working on a web viewer — sorry for the inconvenience. Meanwhile, you can view photos in the FREE app :)
Send a link to my phone →"

That's bait and switch, kids. Don't fall for it.

But if you're on a phone, clicking on the link takes you directly to Google Play or the App Store, so you can download the App.

STOP! Don't do it! Read the reviews!

Once you install the app, it immediately harvests your contacts list and sends to them the same message that it sent to you, offering to share YOUR photos with all of your contacts - if THEY will install the app.

That's classic virus spam behavior. It's bad. You will be sorry.

PhotoKeeper advertises itself as a good way to keep track of all the photos you have tucked into various electronic places. Maybe it does that. It may even be good at it. But a photo-management app shouldn't need access to your Contacts, and it DEFINITELY shouldn't be sending unsolicited emails to your Contacts without your knowledge or permission.

IF YOU READ THE REVIEWS:

Until a few minutes ago, among the 100-plus reviews were 19 five-star reviews dated September 30, 2016 and October 10, 2016. These were all one-line reviews that said things like "Good game!" and "Fun to play!" One even said "Good strategy game!" It's not a game, and the reviews were spam: totally bogus reviews put up there by PhotoKeeper's makers to inflate their rating on Google Play. The two reviews posted on October 11 also look bogus.

Some of the later reviews praise the app's "editing tools." These reviews are also bogus. How do I know? BECAUSE THE APP DOESN'T HAVE ANY EDITING CAPABILITY.

THE BOTTOM LINE:

Think twice before you download PhotoKeeper. Maybe even think three times. There are other ways to manage your photos which don't involve surrendering control of your phone to a shady app backed by fake reviews.

p.s. I'm open-minded. I'm willing to be proven wrong about PhotoKeeper. I haven't installed it myself. After the research I conducted in order to write this blog entry, I chose not to.

Tuesday, December 16, 2014

A Lunchtime Conversation With My Niece

I had a lunchtime conversation with one of my many beloved nieces. I reprint it here, for your viewing enjoyment.


I hope it's clear to you how much fun we have together.


Thursday, December 4, 2014

Two great apps for Android

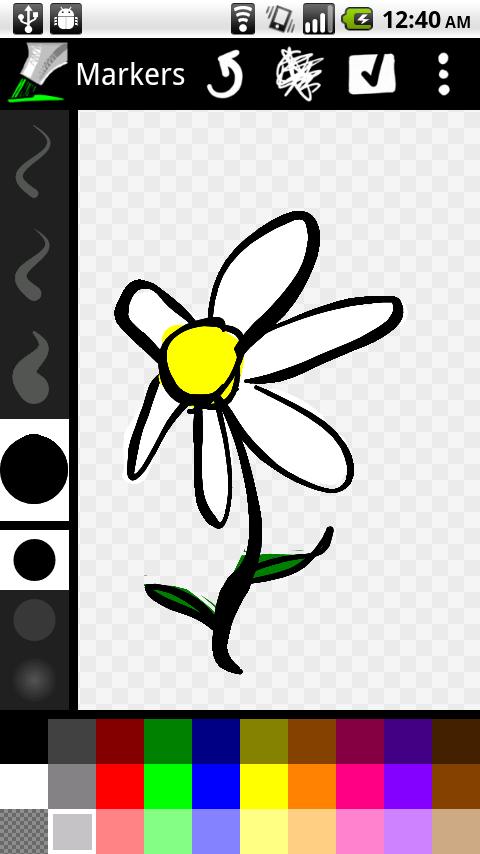
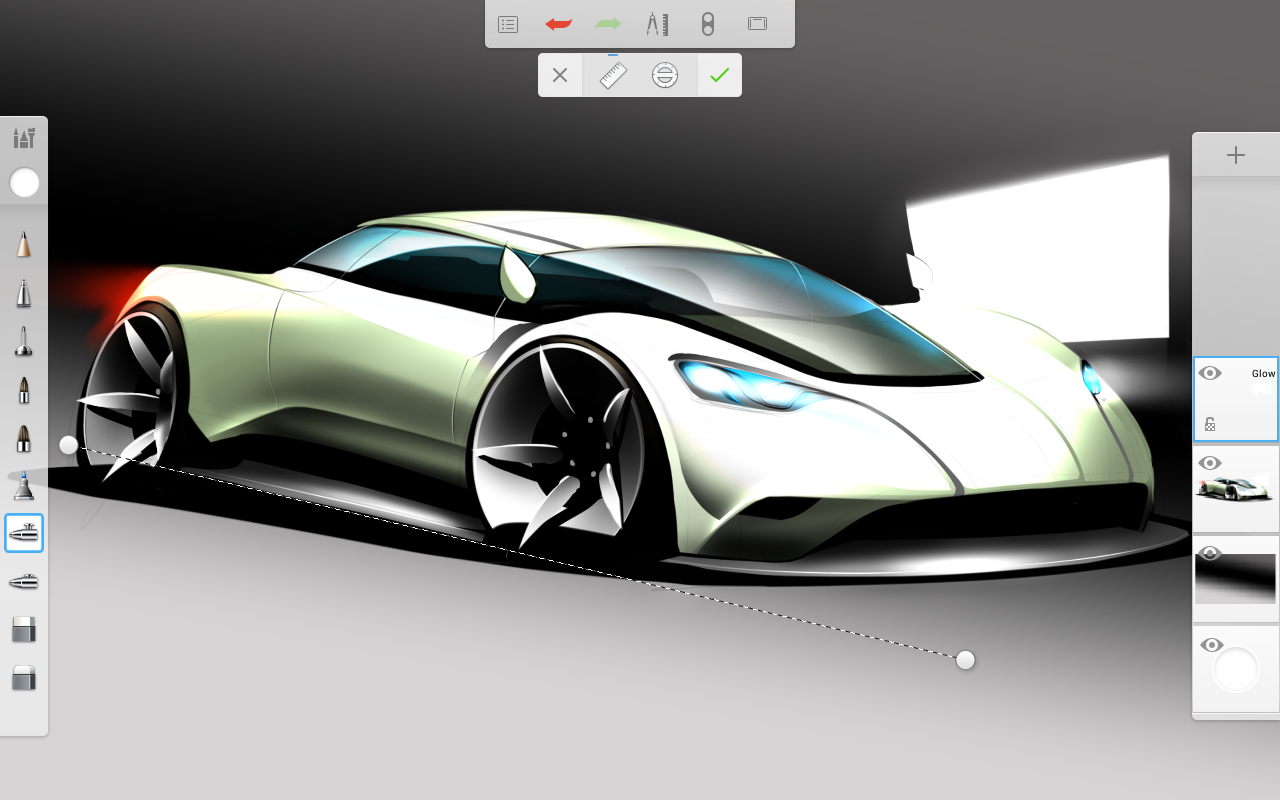
Let me tell you about two great drawing programs for Android: Markers and Autodesk SketchBook.

Apple device users have long had access to a quick-and-dirty drawing app called Jot!, and a more complicated app from Autodesk, called Sketchbook. I was so pleased with both apps that I once wrote an article recommending them to you.

I've been looking in vain, for over a year, for an Android app to match Jot! which, unfortunately, is an iOS-only app. I think I finally found it.

With the unassuming name of "Markers," this app sticks to the fundamentals: it lets you do quick-and-dirty sketches. You can change brush sizes, styles and colors, but the selection is intentionally kept small, to keep the application simple and uncluttered. It's not really fair to do a feature-by-feature comparison of Markers to Jot!, because one only works on Android and the other only works on iOS.

(It turns out that Markers has been around for over two years. I don't know how I missed it, but I'm glad I finally found it.)

Some of the nice features of Markers:
  • It's pressure-sensitive, varying line width according to how hard you press on the glass.
  • The background is transparent, not white, so you can draw with a white marker.
  • If you draw with two fingers, you get two lines; three fingers gives you three lines and so on, up to whatever limitations your hardware imposes.
  • You can zoom and pan the drawing surface - very useful if you start getting complicated.

Markers - screenshot
A sample Markers screen. If you click on the green marker in the upper left corner, the menu disappears, leaving you with a full-screen drawing surface.

Jot! for iOS is available in both a free and a paid version; the paid version gives you extra exporting and sharing capabilities. Markers for Android is simply free. The author, Daniel Sandler, keeps a small website devoted to the project, at https://code.google.com/p/markers-for-android/. You can download Markers from the Google Play app store. Follow this link: https://play.google.com/store/apps/details?id=org.dsandler.apps.markers.

Now, let me tell you about SketchBook.

Autodesk knows how to follow the income stream. Their SketchBook app is available on both Android and iOS devices. As far as I have been able to tell, the app behaves identically on both platforms. SketchBook comes in three flavors:
  • SketchBook Express, free and good enough for casual users
  • SketchBook, also free but frustrating until you upgrade to Pro
  • SketchBook Pro, $3.99
For casual users, SketchBook Express will fill all your needs, but Markers is easier to use. Serious users will want SketchBook Pro. You don't download and install SketchBook Pro directly. You install SketchBook, and then you buy the Pro Tools inside the app. Installing the Pro Tools is what turns SketchBook into SketchBook Pro. Believe me, for four bucks, it's worth upgrading to the Pro version.

Autodesk SketchBook - screenshot
A sample SketchBook screen.
SketchBook is an entire Autodesk product line, spanning platforms from mobile devices to serious desktop workstations. Autodesk supports the product line at its own website, https://www.sketchbook.com/. You can download SketchBook from the Google Play app store. Follow this link: https://play.google.com/store/apps/details?id=com.adsk.sketchbook.

One little note about the reviews at Google Play: many SketchBook reviewers gripe, and with some (but not a lot of) justification, that the free version of SketchBook is more like an advertisement for the Pro version, and that they feel deceived in some way in having to upgrade to Pro to get the tools they need. Eh. Think of it as an evaluation copy. Avoid the disappointment and frustration that the reviewers experienced, by planning from the start to spend the $3.99 and upgrade to Pro immediately. That way you will know exactly what you are getting and you won't feel like anybody's trying to pull a fast one on you.

Besides, the SketchBook app is easily worth $10 or more. And the Markers app is worth $2 or $3. They're both bargains at their current prices.

Monday, October 28, 2013

HP calculators live on, small thanks to HP

UPDATE, 22 JAN 2024:

The Desmos product line continues to expand. Remember, these are all free apps. Their current offerings include:
The Desmos 3D calculator is an exciting new product! As of this update, the 3D calculator is still in Beta. But it is as intuitive as their original offerings. I typed in three equations: x = cos theta, y = sin theta, and z = theta, and the calculator plotted a nice spiral surface for me. No RTFM necessary. It just works!

Thomas Okken, the creator of Free42, has added another project to his page. Plus42 is an enhanced version of Free42. It's a paid app on Android and iOS, but is free for Mac, Windows, and Linux PCs. Please support his efforts by giving him money, one way or another.

The SwissMicros DM42, which runs Free42, is still being built and sold, and actively supported, and getting rave reviews online. I still want one.

In fact, the hardware and OS of the DM42 are so good, that it has proven to be infinitely customizable. The DM42 hardware serves as the host platform for other, new, open source calculators, such as the WP43, the C47, and the DB48X (yes, that's a "48"). These developments may deserve their own super-nerdy blog entry here on Zyzmog Galactic HQ. At the very least, in lieu of that blog entry, click on the links above and read about them for yourself.

The HP-12C (the Calculator that Refuses To Die) is still selling. Wikipedia calls it "HP's longest and best-selling product." HP has upgraded the HP-12C's innards several times now, so it keeps getting better and better. Other than the 12C, HP's calculator line is basically defunct.

TI continues to sell their ancient and overpriced TI-84 series to a captive market, but I think that their influence is finally waning, thanks to Desmos and others. TI doesn't appear to be pouring any more software engineering effort into improving their cash cow / golden goose. Let us wish TI a speedy march into oblivion.


UPDATE, 18 JUL 2022:

This is still one of the most widely read articles on my blog. That's gratifying. I'm glad to see that it is so useful to so many people.

The SwissMicros version of the HP42 drifts in and out of stock, as do the rest of the SwissMicros calculator product line. Don't let that worry you. It's merely a sign of the craftsmanship with which these beauties are built. (p.s. I want one.)

The Desmos calculators continue to march ahead. More power to them, I say, and to Eli Luberoff and his company. I hope that they make tons of money. Don't worry; their calculators are still free to you, and always will be.

And a final bit of good news: Free42 is not only alive and kicking after 15 years, but it is thriving! It is still in active development. The latest version was released a little over a month ago, in February 2020. If you have followed my recommendation and downloaded this little jewel, consider helping out by clicking on the Donate link on the Free42 webpage and sending Thomas a little cash.

UPDATE, 3 OCT 2019:

There's a Swiss company, SwissMicros, which makes absolutely beautiful replicas of some of the greatest HP calculators: the 10, 11, 12, 15, 16, 41, and 42. Yes, the 42.

There's a new game in town, and it makes the HP and TI calculators as obsolete as dinosaurs. Read this blog article about Desmos.

UPDATE, 27 SEP 2019:

This is one of the most widely read articles on my blog. It's good information. Since Apple did some housekeeping on their App Store, some of the picture links are broken. I've replaced them with local pictures.

In addition, Graphix48 has disappeared from the App Store. I wish I'd saved a local picture of it, because it was good. The developer's web page has also disappeared.

NOW, FOR THE ORIGINAL ARTICLE, 28 OCTOBER 2013:

The first pocket-sized scientific calculator in the world was the HP-35, invented by Hewlett Packard and introduced to the world in 1972. HP literally created the market for handheld scientific calculators. Although many worthy competitors arose, none could match HP's quality, reliability and overall superior design. HP was king of the mountain until Carly Fiorina chose to pull the plug on the calculator division sometime in the 1990s around 1999, and ceded the entire market to Texas Instruments.

Carly's excuse at the time was that "calculators are not profitable," which was an outright lie. We won't get into that here. That's water under the bridge. The geniuses who invented such dominant creatures as the HP-12C (the financial calculator that refuses to die), the HP-41 series and the HP-48 series, have moved on to other careers. So has Carly. Around HP, some people still spit after they say her name.

HP calculators have a vast and loyal fan base around the world. Some of those fans were later hired by HP to revive the calculator division, but it was too little, too late, and HP has never reclaimed the market. Like I said, that's a topic for another time, and besides, whining about it won't bring back the glory days.

One of the wisest things HP did, after announcing the dissolution of their calculator division, was release their ROMs into the wild. You can find ROM images, and maybe even source code, for many of HP's calculators online. I believe you can even find source code and emulators for the Saturn and other 4-bit CPUs at the heart of the calculators. (No, I won't include links. Go sniffing for them if you want them.)

Thanks to this wise and generous move by some key players inside HP (see the note at the end), their calculators live on. You can now have an HP calculator app on your iOS or Android device. These emulators work as well as the real things, including support for external storage and printers (on some apps).

My (free) recommendations for iOS: i48 ( two different views) and Graphix48 (right).
i48 screenshoti48 screenshot 2


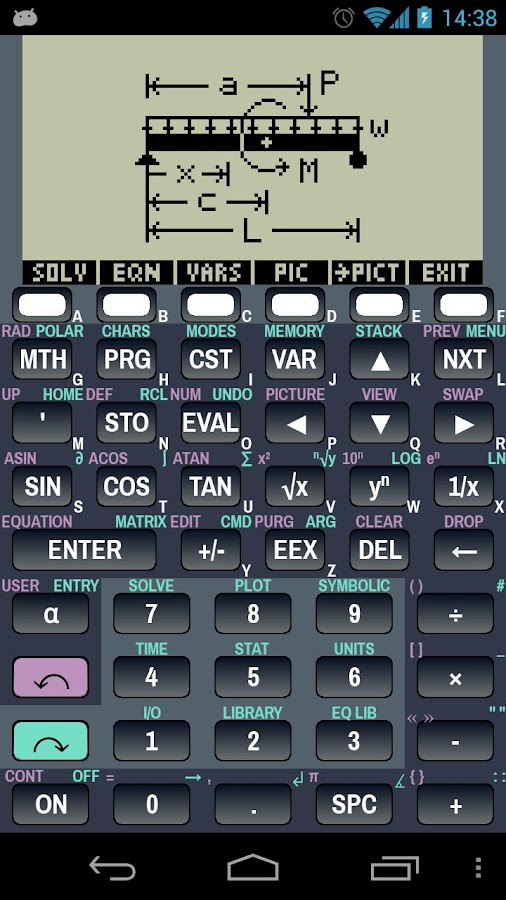
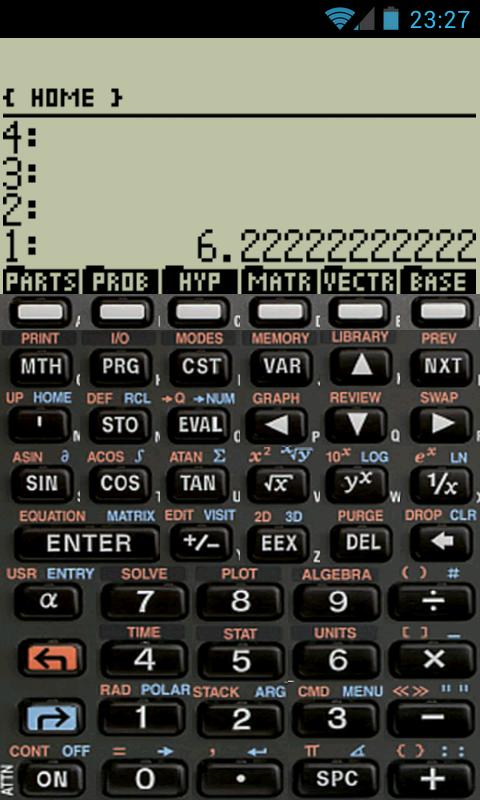
My (free) recommendations for Android: Droid48 (left) came first. Droid48sx (right) is a beautiful follow-on product.


go48g is a really sweet alternative to Droid48. And if you're an HP-41 fan, go41c is a beautiful (and free!) HP-41 emulator.


On iOS, youcan also buy i41cx, an HP-41CX emulator.


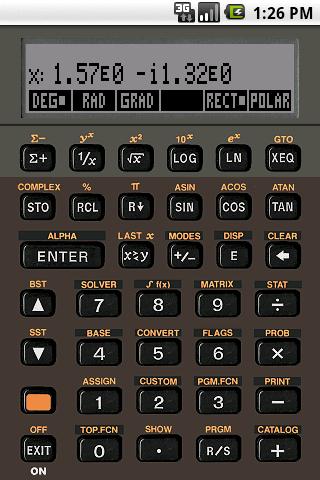
Once you've made the leap from free calculators to ones you actually spend money on, your whole world opens up. You can get expandable versions of the HP48 and HP41 series. You can get the HP-12c and all of its sideways brethren. And you can get my personal favorite, possibly the best overall scientific calculator HP ever made, the HP-42S. What? You've never heard of the 42S? Well, that's another story for another time.

Wait! Don't spend your money yet! Here's an open-source version of the HP-42S emulator! It doesn't use a single bit of HP's ROM images; it merely duplicates the functionality. (Merely? That's a lot of mere.) For iOS (left) and Android (right).

 Free42 - screenshot

Free42 is also available for Windows, Mac, and Linux operating systems.


A note about those "key players": The HPers who released all of this code into the wild were not the movers and shakers at the top, who nearly drove this once-great company into the ground. They were a tiny number of HP engineers and engineering managers with a combination of passion, integrity and vision that is seldom seen inside HP anymore. I don't know whether they did it with the executive suite's blessing or not, but either way it was a bold move on the part of the engineers and the engineering managers, for which we thank them.

Thursday, January 10, 2013

Importing Your Contacts into a Google Nexus 7

Here's a simple, easy, three-step procedure for copying your email Contacts or Address Book to your new Google Nexus 7. I think it will work on other Android devices as well. You don't even need your Android device to do it. Just do it all on your computer.

Here are the steps:
  1. When you first started up your Nexus 7, you were required to set up a Gmail account. If you didn't do it then, just do it now. It's not that hard. And you don't have to use it; you only need to have it. You can set it up from any computer, by pointing your browser to http://www.gmail.com.
  2. Open your email program, or login to your browser-based email application. Go to Contacts or Address Book, and find a way to Export your contacts or address book as a CSV file. Most email programs can do this. (CSV stands for "Comma-separated values." If you open the file in Notepad to have a look at it, you will see that it's everything in your address book, separated by a bunch of commas.)
    (Note for those who care: You can also export your contacts or address book as a VCF file, but the beauty of my procedure is that you don't need to. A CSV file works just fine.)
    (Note for those who don't care: VCF stands for "Virtual Card File." I know; the "F" is redundant. Hey, I didn't invent it.)
  3. Log into Gmail. Click on the "Gmail-downArrow" button and select "Contacts." In Contacts, click on the "More-downArrow" button, and choose "Import...". Click "Browse" to find and select the CSV file you just created in Step 2. Then click the "Import" button.
That's all there is to it: you create a Gmail account, you export a CSV file from your existing email program, and you import it into Gmail.

You don't need to use Gmail on your Nexus; you can keep using your regular account. All of those imported contacts are in the People app on your Nexus, and your email account automatically knows about all of them.

UPDATE, FRIDAY 9:30 A.M.:  This method doesn't import those collections of addresses known variously as Groups, Distribution Lists, and Mailing Lists. Neither CSV files nor VCF files were designed to hold lists like that. If any of my readers knows how to import Distribution Lists, please comment on this post and enlighten us. Until then, I guess you'll just have to recreate them manually.

UPDATE, ABOUT A YEAR LATER: As emil pointed out in his comment, you need to make sure that the Google account in your Nexus 7's Settings menu is the same one you use in Step 3 to import the contacts.

Monday, February 6, 2012

Is anything NOT made in China?

I intend to research this for myself, but I thought I'd ask here first.

Recent news articles have exposed the terrible, sometimes fatal, working conditions imposed on workers who assemble Apple's iPhones and iPads in China. These articles have implicated Foxconn and many other Apple contractors in China, who pay their workers horribly, force them to endure long hours working in dangerous and unhealthy conditions, and more or less treat them as disposable supplies, like paper towels.

Apple has yet to respond in a way acceptable to socially conscious consumers; however, Apple's products have enough going for them that consumers are still buying them. That may change, if Apple does not quickly show some sense of social responsibility.  You read it here first, folks. But that's not the main thrust of this article.

Apple is not the only company to find itself in this predicament, with a popular and competitively priced product line, completely dependent on China for its manufacture. As I have said before, you cannot buy a small kitchen appliance right now that is not made in China. After this weekend, I will add that you cannot buy a men's suit for under $500.00 that is not made in China. Can you buy a flat-screen television that is not made in China? How about a smartphone?

Let's focus on smartphones for a minute. The largest (and maybe the only) viable competitor to the iOS smartphone right now is the Android smartphone. Two of the largest makers of Android-based smartphones are Samsung and LG, followed by Motorola, HTC, and the rest of the gang. Here's a serious question: Which Android-based smartphones are NOT made in China?


Samsung and LG are Korean labels. A South Korean businessman recently told me that iPhones make up 26% of the South Korean smartphone market, while Android phones make up the other 74%, with the  majority of those Android phones being Samsung. Are Samsung smartphones made in Korea? What about LG smartphones? Searching for the word "China" in their Wikipedia entries comes up with zero.

(Another big unanswered question: Can we assume correctly that working conditions in Korea are better than they are in China?)

And what about Nokia? Well, Nokia is a Finnish label.  That's right, one of the most reliable names in the cellular phone business is headquartered in the tiny (but very advanced!) country of Finland. According to Wikipedia, two of Nokia's nine manufacturing facilities are in China. But Nokia phones don't run Android. They still run Symbian, though some ran Linux for a bit and they're all slated to run MS Phone 7 starting in late 2011.

One of Nokia's subsidiaries is a relatively unknown company called Vertu. Vertu makes "luxury" smartphones by hand, out of the finest materials, in its factory in England. The screen is a thin sheet of clear, transparent, single-crystal sapphire. Each key is individually machined from a chunk of sapphire. All of the apps are custom-written, and they run on Symbian. Okay, so this one counts as "not made in China," but you won't find very many Vertu phones on the street. They start at about US$5000.

Does that leave Samsung and LG as the only smartphone choices for the socially responsible consumer? (And, as it turns out, for the environmentally responsible consumer - both manufacturers have been recognized for their environment-friendly practices.)

LET'S BROADEN THE DISCUSSION:  What about children's toys? Printed books? Flat-screen televisions? Stereos and home entertainment systems (even the ones with Japanese names)? Computer hardware? Dishes and cutlery? Automotive parts? Automotive accessories? Hand tools? Power tools? What can we buy today that is not made in China?

Please hit the Comment link and add to the discussion. Don't be scared off by the Captcha thingy or my comment-moderation policy. If you're not a spammer or a Net loon, your comment will be posted within a few hours.

Thursday, February 4, 2010

Nokia offers smartphone GPS software for free

Nokia smartphone users must be doing a happy dance right about now. A month ago, Nokia started offering free GPS navigation software to worldwide users of their smartphones - seriously, free. One of their advertising slogans is "For free. Forever."

Most smartphones have built-in GPS capability, but it's turned off until the user buys an app that activates it. Very clever users can activate the GPS capability themselves, but you still need an app to make the GPS useful -- a driver and/or an interface, in computerese.

(Users of Google's Android phones have had free GPS right from the start. They finished their happy dance a long time ago.)

Apparently the free GPS software is a very popular idea. It's been downloaded millions of times in a month. Yesterday, a Nokia executive said, "We're averaging a download a second, 24 hours a day."

Now, if Samsung, LG and Motorola will jump on the bandwagon, the rest of us can do the happy dance, too.

(BE CAREFUL! The fine print on one of the Ovi Maps webpages says that while the software is free, downloading the accompanying maps could get massively expensive if your phone plan doesn't include unlimited data - or if you can't download them to your phone through your computer.)